

Dial gauge is a type of mechanical comparator that is used to check various tolerances of manufactured parts. In many applications for manufacturing, the dial gauge is an instrument that can measure with precision accurately.
What is a Dial Gauge?
Dial gauge or also known as a dial indicator, is a comparison measuring instrument (comparator). This tool is used to measure a workpiece's flatness of surface, roundness, runout, and so on. The working principle of the dial gauge is dependent on the movement of the spindle. It travels up and down. This movement is then converted to a rotating needle (pointer) scale reading.
The dial gauge can measure up to a reading of 0.01 or 0.001 mm.
What Makes Up a Typical Dial Gauge?
The dial gauge consists of several parts, please see the following picture to see the parts of the dial gauge.

Moore & Wright Dial Gauge Indicator 401 Series
A dial gauge consists of the following parts:
1. Case: the outer part of the dial gauge.
2. Lock: serves to lock the pointer needle in a certain position when reading the measurement results.
3. Long pointer (long needle): indicates the measured value on the scale.
4. Short pointer (short needle): shows the number of rounds made by the long pointer. For each full revolution on the long pointer, the short pointer will highlight the movement by moving one strip.
5. Scale: part of the dial gauge that shows the numbers from the measurement results.
6. Stem: a place for the spindle to move up and down and commonly used by holders to place the dial gauge in position.
7. Spindle (also called plunger): moves up & down which serves as an input to the dial indicator.
8. Point of contact: the point of interaction between the workpiece and the tool. This section is one of the most important indicators and comes in several types.
Dial Gauge Function
The functions of the dial gauge are as follows:
1. As a comparison in mass production.
2. As a comparison of two heights or two distances between narrow boundaries.
3. Determine errors in geometric shapes, such as oval, round, and taper.
4. Accurately measure deformation such as intention and compression.
5. Determine surface position errors such as parallelism, quadratic, and alignment.
6. Check the center alignment and angle measurement.
Types of Dial Indicator
Dial indicators consist of several types catering for unique needs, here are some types of dial indicators:
1. Balanced Reading Dial Indicator
In such types of dial indicator, the numbers are divided in two directions. Positive numbers are calibrated to the right of zero and negative numbers are displayed to the left of zero.
2. Reversed Balanced Dial Indicator
This type is the opposite of the balanced reading dial indicator.
3. Continuous Dial Indicator
The numbers on this type of dial indicator run clockwise, without stopping and without any separator.
4. Reversed Continuous Dial Indicator
This type is the opposite of continuous dial indicators. The numbers on this dial indicator run counterclockwise fashion, without stopping and without any separator.
5. Prelinger Dial Indicator
This type has a clockwise appearance and is used to measure injection molding machine work.
6. Lever Dial Indicator
This type is characterized by its lever and scroll mechanism, which causes the stylus to move. This type is more compact and easier to use than the plunger type.
How to Use a Dial Gauge?
Using a dial gauge is quite easy compared to other measuring tools, here's information on how to use a dial gauge:
1. Positioning the Gauge Dial
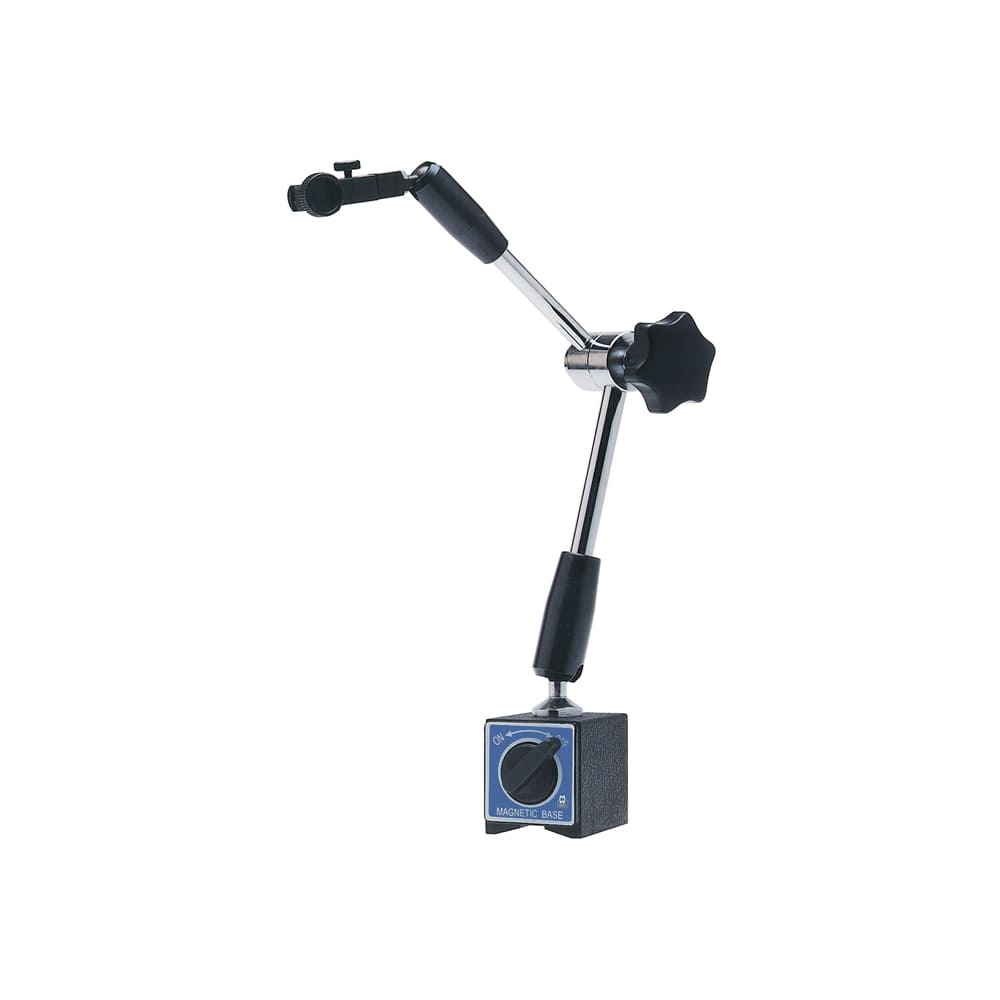
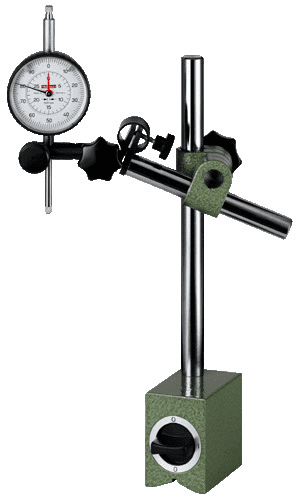
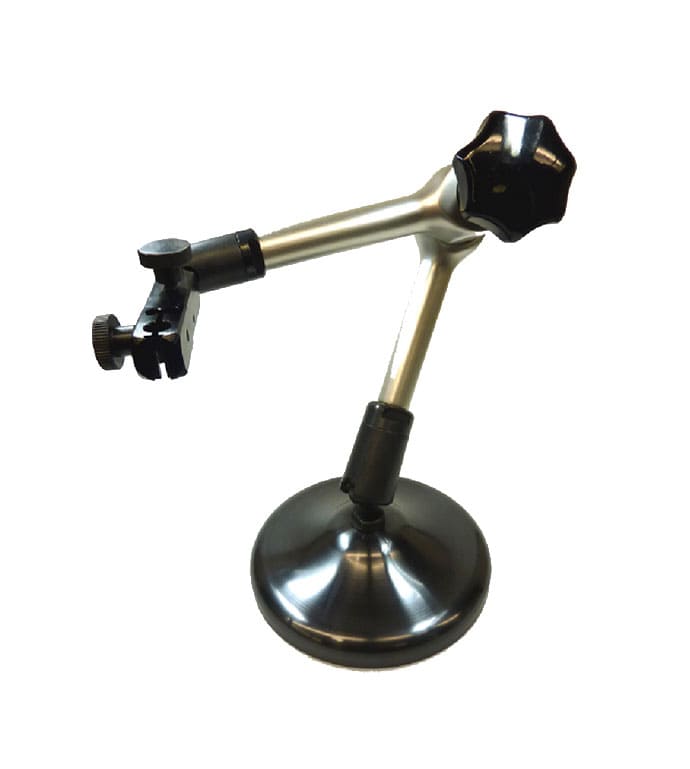
Before you take measurements with a dial gauge, the first step you take is to adjust the holder according to the condition of the workpiece to be measured by adjusting the lock. Below are some examples of dial gauge and dial test indicator holders. They are frequently used with dial gauges and dial test indicators. These are also sometimes known as magnetic bases or magnetic stands.
|
|
|
|
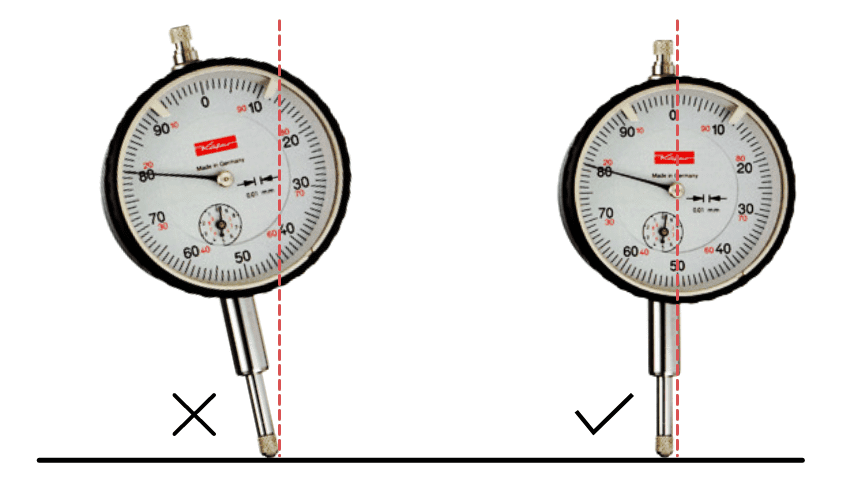
Using the holder, position the spindle in the center of the workpiece axis perpendicularly. If a spindle's position is not perpendicular to the surface, it might affect the measurement results to be inaccurate.
2. Calibrate the Dial Gauge
Like other measuring instruments, dial gauges also require a calibration process so that the measurement results can truly match the actual situation. Calibration on the dial gauge can be done by setting the long pointer and short pointer so that it points to zero on the scale.
3. Carrying out the Measurement Process
After you have the tip of the dial gauge perpendicular to the surface. Ensure that the tip and the workpiece surface are touching each other and then, watch the reading. You must move the bezel to the right or to the left so that the pointer aligns with the zero mark. You can also shift the bezel after taking some measurements. Once the zero mark and pointer are aligned with each other, you need to tighten the bezel but not too much.
4. Care After Use
After you have finished using the dial gauge, it needs to be cleaned of dust or dirt using a soft dry cloth or a cloth moistened with alcohol. Check the wear level on the probe tip regularly and replace it if it is worn. Then store in a dark, dry container, and ensure that the probe is not exposed to pressure when stored.
How to Read the Dial Gauge Scale
You must know the specifications of the dial indicator before taking readings, such as resolution, travel range, and total division on the scale.
How to read the dial gauge scale in millimeters is as follows.
1. Pay attention to the direction of movement of the short pointer, (-) if it is counterclockwise and (+) if it is clockwise.
2. Each number strip traversed by the long pointer must be multiplied by 0.01 mm. For example, the long pointer points to the number 60 so the size is 60 x 0.01 mm = 0.6 mm.
3. Each number strip through which the short pointer passes indicates a size of 1 mm. For example, the short pointer first points to the number 1 and then moves to 2 during measurement, the needle moves 1 mm and shows that the long pointer has rotated 2 times, so 2 x 1 mm = 2 mm.
4. After observing the long pointer and short pointer, the number of short pointers is added up with the multiplication result of the long pointer. For example in this case, the short pointer number is 2 mm and the long pointer is 0.2 mm. Then the measurement result is 2 mm + 0.6 mm = 2.06 mm.
Dial Gauge Advantages
1. The size of the dial gauge is so small that it can be used easily in mass production.
2. Easy to read.
3. Minute variations can be detected.
4. No special training required to use the dial gauge.
5. The dial gauge can be used to measure the tapper on round objects easily.
6. It is suitable for linear measurement.
7. Unaffected by temperature changes or gauge wear.
8. Incredibly low contact pressure, so no impact on mechanical components.
Disadvantages of Dial Gauge
1. The accuracy of the dial gauge is often reduced due to engine vibration.
2. The most common error factor of the dial gauge is the parallax error. However, this error can be eradicated with the use of digital indicators.
3. Due to space limitations, the dial gauge must be installed at an angle, which results in loss of tool accuracy.
LFC's Range of Dial Gauges
1. Sylvac Digital Dial Indicator Gauge S_Dial Work Basic

Sylvac Dial Gauge S_Dial WORK BASIC is engineered with a digital display and repeatability up to 2µm so that the presence, or exact quantity, of some small distance can be conveniently realized. It has many advantages over their analog predecessors. The durable enclosure itself is made with similar construct as to IP67 certified dial gauges. Furthermore, a flash memory card slot enables data measured to be stored internally in a tabular dataset (such as a database table or spreadsheet) for easy statistical data analysis.
2. Sylvac Digital Indicator S_Dial Work Bluetooth SMART

The Sylvac S_Dial Work BT Smart is a digital indicator with built-in Bluetooth transmission. It has a max error of up to 3um with a reinforced clamping shaft. This device can also be used for improvised gauging rig with Sylvac's gaging multiplexer software. Combined with D300S digital display for automatic detection of gauge and easy data collection experience.
3. Sylvac Digital Test Indicator S_Dial S234 IP65

Sylvac Digital Test Indicator S_Dial S234 is devised to accurately measure small distances, cylinders and angles, and amplify them to make them more obvious readings. Sylvac Digital Test Indicator S_Dial S234 is engineered with both digital display and an analog bar for convenient reading. With repeatability up to 3µm, you can conveniently realize the presence or exact quantity, of some small distance.
4. Käfer Precision Dial Gauges KM Series

Käfer Precision Dial Gauges KM Series are devised as reliable gauging for various applications at reasonable prices. The well thought-out design, accurate components and robust construction of our Precision Dial Gauge series offer reliability, durability, and long working life.
5. Kafer Dial Test Indicators K Series

Kafer Dial Test Indicators are both sensitive and shock resistant. All KAFER Dial Test Indicator's bodies are engineered with hard chrome to be as sturdy as possible on any production floor. Precise gauging on moving parts is always only ensured (especially for a long distance) if resistant contact points are used.
Dial Gauge Authorized Distributor in Singapore
LFC PTE LTD is the official distributor of dial gauge products in Singapore. If you want to discuss measuring tools for your company's needs, please contact us via the contact page.
You can also learn more about Sylvac, Moore & Wright and Käfer products by viewing the catalog on our website.
Visit our facebook, instagram, youtube and linkedin pages to get the latest updates about industrial equipment.

